Visão Geral
Este Guia Rápido destina-se a fornecer informações sobre as considerações e os processos necessários para implementar uma estratégia de backup usando o protocolo NDMP com o software de backup Enterprise Bacula. Ele apresenta várias técnicas e estratégias para o backup dos arquivadores NAS usando os protocolos NDMP ou NFS/CIFS com o Bacula Enterprise Edition, incluindo restauração granular de um único arquivo e recursos de snapshots do NAS [1].
Existem uma série de Linhas de NAS homologadas para uso com o Plugin NDMP, dentre outras:
- EMC Celerra
- Hitachi BlueArc
- NetApp
- Huawei OceanStor
- EMC Isilon
- EMC Unity
A versão atual do plugin NDMP também suporta a versão DataONTAP 7.3, 8.0, 8.1, 8.2 e vários outros fornecedores da NetApp.
Backup sem Plugin NDMP
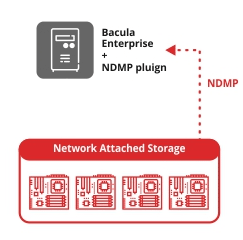
De acordo com a Figura 1, existem vários protocolos que podem ser usados para fazer backup de um equipamento NAS. Geralmente o NDMP é melhor, porque usar o NFS ou CIFS para apresentar arquivos para backup é muito lento, especialmente ao lidar com milhões de arquivos pequenos. A varredura de diretório e a latência da rede tendem a diminuir drasticamente o throughput de backup. Usar os protocolos NFS ou CIFS para fazer uma restauração completa em um grande NAS pode consumir muito tempo, especialmente em uma situação de recuperação de desastres urgente.
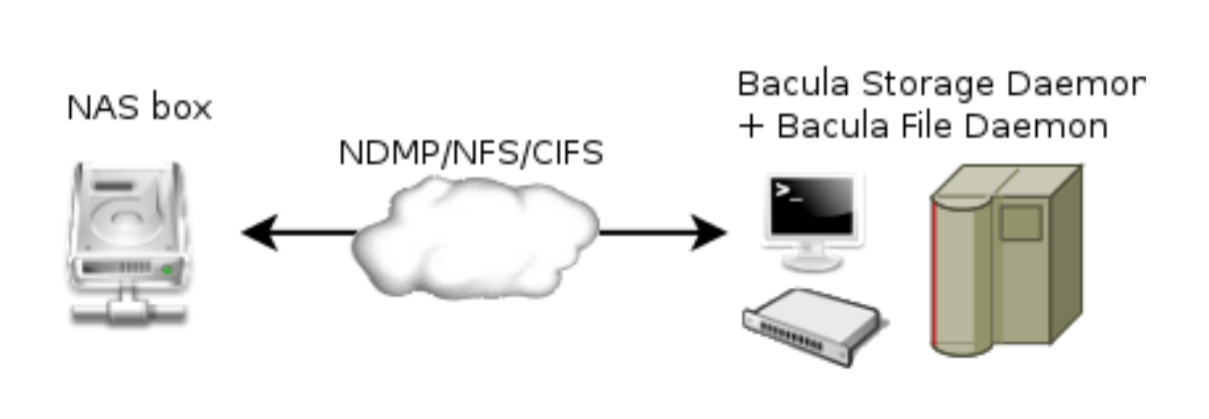
Figure 1. Diagrama Backup sem Plugin NDMP
Fazendo Backup com Plugin NDMP
O NDMP tem a principal vantagem da velocidade sobre os protocolos NFS/CIFS para fazer backup de volumes NAS. A coisa mais importante para entender sobre o NDMP é que é um protocolo de controle, não um formato de backup. O formato de backup do NDMP é arbitrário (específico da implementação) e definido individualmente por cada fornecedor da plataforma de armazenamento. Assim, em geral, um backup NDMP feito na caixa NAS de um fornecedor não pode ser restaurado na caixa NAS de um fornecedor diferente.
O plug-in Bacula NDMP dispara snapshots nos equipamentos storages e gera backups dentro do fluxo de dados de backup padrão do Bacula, permitindo que ele seja multiplexado com outros fluxos de backup e todos os recursos avançados. Dentro do fluxo de dados salvos que contém esse fluxo NDMP, os dados reais do NDMP permanecem opacos (formato específico do fornecedor, às vezes proprietário). Atributos como ACLs são incluídos no fluxo de backup e manipulados corretamente pelo fornecedor NAS no backup e restauração.
É possível fazer uma restauração de arquivo único por meio da técnica de restauração de item único (use_hist option). A restauração de um único arquivo com o plug-in NDMP também é possível restaurando o fluxo de dados NDMP em uma máquina local (a mesma que o Backup com NDMP tem o plug-in NDMP) e abrindo o arquivo resultante. Isso requer que você conheça o formato de dados do fornecedor e tenha um programa que possa lê-lo. Como envolve a restauração de todo o backup e a extração dos arquivos desejados, esta última não é muito eficiente.
O plug-in suporta a opção de backup do NetApp SMTAPE.
Recuperação Granular em Nível de Arquivo
Nos sistemas NDMP que suportam DAR, a opção de plugin use_hist pode ser usada para habilitar o recurso “Single Item Restore”. Com a opção use_hist, todos os nomes de arquivos incluídos em um dump são armazenados no catálogo Bacula, e uma sessão de restauração terá a capacidade de escolher arquivos ou diretórios individuais a serem restaurados. Somente os arquivos selecionados são restaurados no sistema de destino do NDMP. O arquivo de despejo correto é selecionado automaticamente durante o processo de seleção de arquivos.
Instalação do Plugin
O plug-in Bacula Enterprise Edition NDMP é composto de três arquivos que devem ser instalados com um File Daemon em execução no mesmo servidor que está executando um daemon do Bacula Storage que armazenará seus dados. Isso evita o envio dos dados de backup através da LAN do daemon de arquivo para o daemon de armazenamento. É possível instalar o plug-in NDMP em qualquer outro host, mas fazer isso é menos eficiente porque fará com que os dados percorram dois links de rede – uma vez do NAS para o File Daemon e outra segunda vez do Daemon de Arquivo para o Armazenamento Daemon.
Pacotes binários estão disponíveis para um número limitado de plataformas suportadas pelo Bacula Enterprise Edition. Por favor, entre em contato conosco para ter acesso a eles.
rpm -ivh bacula-enterprise-ndmp_8.10.x.rpm
# or
dpkg -i bacula-enterprise-ndmp_8.10.x.deb
Esses pacotes garantirão que sua versão do Bacula Enterprise Edition seja compatível com o plug-in do NDMP e instalará os programas bndmp e ndmp-fd.
/opt/bacula/plugins/ndmp-fd.so
/opt/bacula/bin/bndmp
/opt/bacula/bin/idx_dump.pl
Configuração
Seu File Daemon deve ter um acesso direto à rede para o NAS, você pode testar a comunicação usando o telnet.
# telnet nasbox 10000
Connected to nasbox.
Escape character is '^]'.
Observe que o NDMP, ao fazer o backup real, se conecta de volta ao servidor do Bacula. Isso pode exigir que os firewalls, inclusive firewalld e iptables sejam configurados de acordo. Usando a opção data_port_range, é possível controlar quais portas TCP o NAS tentará usar, permitindo uma configuração de firewall mais restrita. Quando a conexão de rede não é possível, o erro NDMP4_CONNECT_ERR pode ser emitido.
Dependendo da sua configuração, você pode configurar o método de autenticação para md5 ou texto.
As possíveis configurações de plug-in são listadas da seguinte forma.
| Option | Required | Default | Info | Example |
|---|---|---|---|---|
| host | Yes | Hostname NAS | host=192.168.0.50 | |
| user | Yes | Username | user=root | |
| pass | Yes | Password | pass=password | |
| port | No | 10000 | Porta Conexão | port=10000 |
| auth | No | md5 | md5, text, none | auth=text |
| profile | No | nome perfil | profile=root | |
| volume | Yes | Volume para fazer backup | volume=/vol/vol0 | |
| volume_format | No | Formato de volume específico | volume_vormat=/vol/ | |
| file | No | / | Diretório para fazer backup | file=/home |
| type | No | dump | dump, tar, SMTAPE, config | type=dump |
| data_port_range | No | Intervalo de portas backup | data_port_range=2000-3000 | |
| abort_on_error | No | Abortar job havendo erro | abort_on_error | |
| debug | No | Habilitar depuração | debug | |
| use_hist | No | Armazenar informação HIST no catálogo | use_hist | |
| hist_retention | No | Podar informação HIST após determinado tempo | hist_retention=30days |
Formato de Volume Personalizado
O plug-in do NDMP deve estar ciente da organização da estrutura para detectar se o administrador deseja restaurar um novo volume (where=/dev/vol_tmp) ou dentro de um subdiretório do volume de destino (where=/tmp).
O Plugin NDMP detectará automaticamente a seguinte estrutura:
- /vol/ (usado no NetApp)
- /root_vdm/ (usado em alguns EMCs)
Se seus volumes estiverem usando um esquema de nomenclatura diferente, você deverá usar a opção volume_format.
/dev/volume_home -> volume_format=/dev/
/rootvolume/volume_tmp -> volume_format=/rootvolume/
/VG/volume_var -> volume_format=/VG/
FileSet {
  Name = NDMPFS
  ...
    Include {
      Plugin = "ndmp:host=nasbox user=root pass=root file=/dev/vol1 volume_format=/dev/"
    }
}
Por exemplo, na NetApp, o formato do volume é:
/vol/vol1
/vol/vol2
...
A parte comum para distinguir volumes e diretórios é /vol/. No Solaris e no ZFS, os volumes são armazenados em /dev/.
/dev/Volume01
/dev/Volume02
/dev/Volume03
Se seus volumes estão organizados como neste exemplo:
/FS1/
/FS2/
/FS3/
O volume_format deve ser configurado com /FS – note que não há barra final aqui!
Como mostrado na Figura 2, se você tiver a GUI EBacula do Bweb, poderá configurar graficamente o plug-in do NDMP FileSet, e mais tarde um Job.
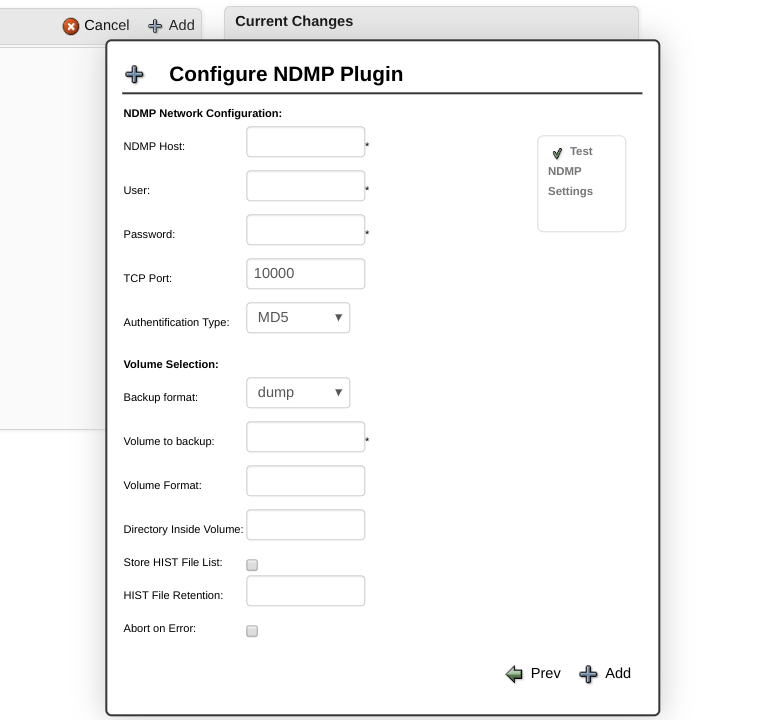
Figura 2. Configuração do Plug-in do NDMP do Bweb
Exemplos de FileSet
Fazer backup de tudo em /vol/vol1 e /vol/vol2:
FileSet {
Name = NDMP
  Include {
    Plugin = "ndmp:host=nasbox user=root pass=root volume=/vol/vol1"
    Plugin = "ndmp:host=nasbox user=root pass=root volume=/vol/vol2"
  }
}
Backup de /home no volume /vol/vol2:
FileSet {
  Name = NDMP_home
    Include {
      Plugin="ndmp:host=nas user=root pass=root volume=/vol/vol2 file=/home"
    }
}
Backup do volume /vol/vol2 usando SMTAPE:
FileSet {
  Name = NDMP_home
    Include {
      Plugin="ndmp:host=nas user=root pass=root volume=/vol/vol2 type=SMTAPE"
    }
}
Backup de um snapshot específico em /vol/vol2
FileSet {
  Name = NDMP_snapshot
    Include {
      Plugin="ndmp:host=nas user=root pass=root volume=/vol/vol2/.snapshot/snap1"
  }
}
Ao usar o NDMP em oposição a volumes montados pelo NFS/CIFS, o software NAS NDMP é responsável por fazer backup de todas as informações referentes a arquivos, incluindo ACLs.
Observação: o plug-in do NDMP não é compatível com a opção “sparse” do FileSet.
Usando o ndmp.conf para Armazenar Credenciais
Se você não quiser expor a senha do NAS na linha de comando do Plug-in, é possível usar um arquivo ndmp.conf armazenado no File Daemon, que conterá as informações da credencial.
No exemplo a seguir, o perfil “root” se referirá ao NAS host “nasbox”, a conexão usará o MD5 como método de autenticação (“/ m”), o nome de usuário será “root” e a senha será “password” .
# cat /opt/bacula/etc/ndmp.conf
[--root]
-D nasbox/m,root,password
O formato do parâmetro -D é o seguinte:
HOST[:PORT][/FLAGS][,USERNAME,PASSWORD]
Onde:
- HOST: É o nome do host ou endereço IP do NAS
- :PORT: número de porta opcional. Se não for fornecido, o número da porta é 10000.
- USERNAME: um nome de usuário que será reconhecido pelo NAS. Se esse é um nome de usuário geral ou uma conta especial no NAS, depende da implementação.
- SENHA: A senha correspondente ao nome de usuário. O campo de senha não deve conter caracteres especiais, como: “,”,!, $, / Ou #
/ FLAGS: Sinalizadores opcionais para indicar a versão ou o método de autenticação do NDMP desejado.
A versão padrão é negociada para ser o mais alto possível. O método de autenticação padrão é o texto (NDMP_AUTH_TEXT).
2: Use o NDMP versão 2.
3: Use o NDMP versão 3.
4: Use o NDMP versão 4.
n: não usa autenticação (NDMP_AUTH_NONE).
t: Use a autenticação de texto (NDMP_AUTH_TEXT). O nome de usuário e a senha são enviados pela rede como texto não criptografado (sem criptografia).
m: Use autenticação de desafio/resposta MD5 (NDMP_AUTH_MD5).
O NAS remoto é solicitado por um desafio. A senha é usada como segredo compartilhado e nunca é enviada pela rede.
No exemplo a seguir, o perfil “11” irá se referir ao host NAS “10.1.1.11”, a conexão usará o MD5 como método de autenticação (“/ m”), o nome de usuário será “root” e a senha será “ minha senha”. Um segundo perfil “12” também é mostrado neste arquivo de exemplo ndmp.conf.
[root@lxbackup ~]# cat /opt/bacula/etc/ndmp.conf
[--11]
-D 10.1.1.11/m,root,mypassword
[--12]
-D 10.1.1.12/m,root,mypassword2
No seguinte exemplo FileSet, dois backups de plug-ins do NDMP são configurados – Um para cada um dos dois perfis NAS configurados no exemplo ndmp.conf acima.
Fileset {
  Name = NDMP_FS
    Include {
      Plugin = "ndmp: host=10.1.1.12 profile=12 volume=/vol/DMZ_backup type=smtape"
      Plugin = "ndmp: host=10.1.1.11 profile=11 volume=/vol/LAN_backup type=smtape"
    }
}
Considerações de Agenda
O formato nativo dump tem uma séria limitação de oito para o número de trabalhos incrementais que você pode executar entre dois backups completos ou diferenciais. Fazer mais de oito Incrementais não permitirá que você restaure seu sistema com precisão.
Todos os arquivos serão restaurados corretamente, mas as restaurações subseqüentes de backups incrementais não recriarão o sistema de arquivos como ele estava durante o backup incremental final.
Configuração e Teste do Volume NAS
Ao especificar o type=config como um argumento do plugin NDMP, o Bacula fará backup de uma visão geral da configuração de todos os volumes NAS para o arquivo /@ndmp/.config.
Para exibir a configuração, basta selecionar o arquivo usando o comando restore, executar a restauração e o Bacula exibirá a configuração do volume NAS no log da tarefa, conforme mostrado no exemplo.
O arquivo de configuração principal da NetApp está localizado por padrão em /vol/vol0/etc. Então, se você deseja restaurar o NAS do zero, você deve incluir o diretório /vol/vol0/etc no seu FileSet de backup.
A opção type = config também pode ser usada para verificar a configuração da rede e as informações de conexão entre o plug-in do Bacula Enterprise Edition NDMP e o NAS. Se essa tarefa de backup não for bem-sucedida, verifique sua configuração ou sua senha.
Plugin = "ndmp:host=nasbox user=root pass=pass type=config"
Uma amostra da saída de configuração do NAS é exibida da seguinte forma.
...
JobId 3: QR File system /vol/vol2
JobId 3: QR physdev
JobId 3: QR unsupported 0x0
JobId 3: QR type WAFL
JobId 3: QR status online
JobId 3: QR space 805306 total, 118784 used, 8052948 avail
JobId 3: QR inodes 288238 total, 100 used
JobId 3: QR empty default env
JobId 3: QR
JobId 3: QR File system /vol/vol1
JobId 3: QR physdev
JobId 3: QR unsupported 0x0
JobId 3: QR type WAFL
JobId 3: QR status online
JobId 3: QR space 8589938 total, 6594560 used, 858334 avail
JobId 3: QR inodes 307450 total, 1703 used
JobId 3: QR empty default env
JobId 3: QR
...
Restore Usando NDMP
Para restaurar arquivos de backup com o protocolo NDMP, você deve selecionar todos os arquivos presentes no diretório /@ndmp/virtual. Você pode alterar o parâmetro where para restaurar seus arquivos para um local alternativo. No entanto, a opção RegexWhere não está disponível com este método.
O parâmetro where pode conter um diretório dentro do volume original ou um diretório dentro de um volume alternativo. A opção volume_format permite configurar como o Plug-in do NDMP distinguirá volumes e diretórios.
No exemplo a seguir, se o volume_format for /vol/, o fluxo NDMP será restaurado para o diretório /tmp no volume “newvolume”.
* restore where=/vol/newvolume/tmp
No exemplo a seguir, o fluxo NDMP será restaurado para o volume original no diretório /tmp.
* restore where=/tmp
Restaurando Arquivos sem o Host NDMP
Em alguns casos, você pode extrair arquivos gerados pelo host NDMP, primeiro restaurando o backup do NAS em sua máquina host de plug-in do NDMP e, em seguida, usando restore ou tar. Para esse propósito, você pode usar a opção where = durante a restauração com o seguinte formato:
* restore where=">/tmp"
Os arquivos NDMP seriam extraídos para o diretório local /tmp/. (Observe que as citações no exemplo acima devem ser usadas somente ao usar o argumento da linha de comando, elas não são necessárias ao editar opções através do menu de restauração).
Restaurando com o NetApp SMTAPE
Você pode fazer backup e restaurar volumes inteiros com a opção SMTAPE usando o caminho para a raiz do volume (por exemplo, /vol/foo). É como fazer backup e restaurar uma partição do disco rígido usando dd ou partimage. O Bacula não precisa saber nada sobre a estrutura subjacente dos dados do SMTAPE, porque quando o volume é colocado de volta on-line após a restauração, o arquivador simplesmente o reconhece como um sistema de arquivos WAFL e passa alegremente pelo caminho.
Para restaurar um volume NetApp com a opção SMTAPE, você precisa colocar o volume offline com o comando vol no host NetApp.
netapp> vol offline /vol/vol1
Volume "vol1" is now offline.
Então você precisa especificar where=/vol/vol1 no comando restore.
Atenção, com este método, quaisquer dados no volume seriam sobrescritos pelos dados salvos anteriormente.
Considerações de Backup Usando NFS ou CIFS como Alternativa
Se você não puder usar o plug-in do EBacula NDMP, algumas considerações alternativas de backups de montagem do NFS e do CIFS serão desenhadas da seguinte maneira.
ACLs Usando o NFS
Para poder fazer o backup das Listas de Controle de Acesso (ACLs) do arquivo, você deve ativar o suporte da ACL no comando mount da seguinte forma:
# mount -t nfs -o soft,intr,proto=tcp,acl nas:/vol/vol1 /nas/vol/vol1
Você também precisa adicionar a opção ACL Support ao seu FileSet:
FileSet {
  Name = FS_NAS_VOL1
    Options {
      ACL Support = yes
    ...
    }
    File = /nas/vol/vol1
}
ACLs Usando CIFS
Se você montar um volume CIFS no Linux, não poderá fazer backup de ACLs. Para fazer o backup de ACLs em volumes CIFS, você deve montar o volume em um servidor Windows no qual o Daemon de arquivo Bacula esteja instalado.
Referências
[1] Backup with NDMP Using Bacula Enterprise Edition Whitepaper. http://baculasystems.com